

Codemagic Integration
This guide will help you integrate Shorebird into your Codemagic workflows.
Choose how to configure Codemagic
Section titled “Choose how to configure Codemagic”Codemagic runs Shorebird from either of its two ways of configuring a build:
- Workflow Editor. Codemagic’s Flutter Workflow Editor has a Shorebird section for Android and iOS. Under Publish updates to user devices using Shorebird, choose Release or Patch, and paste a key (see Authentication) into its Shorebird token field. Codemagic’s Shorebird guide walks through each field.
- codemagic.yaml. Write the
shorebird releaseandshorebird patchsteps yourself, which works for every platform Shorebird supports and lets you run other Shorebird commands. The rest of this page covers this route. If you’re new to the file, see the Codemagic YAML documentation.
Prerequisites
Section titled “Prerequisites”This guide assumes that:
- Your app has been initialized with
shorebird init, andshorebird.yamlis committed to your repository. - Codemagic is connected to your repository (guide).
Authentication
Section titled “Authentication”Creating releases and patches needs a signed-in Shorebird CLI. In CI, the CLI
reads an API key from the SHOREBIRD_TOKEN environment variable, so nobody has
to run shorebird login on the builder.
Use a key that belongs to a service account. A service account belongs to your organization rather than to a person, so its key keeps working when whoever set up CI leaves or changes roles, and the audit log shows the job’s actions under the service account’s name. Service accounts are available on every plan. To create one, you need the Admin or Owner role in the organization:
- In the Shorebird Console, open your organization’s Settings and select Service accounts.
- Click Create service account, name it after the CI system that will use
it (such as
GitHub Actions), and click Create. - Keep the Developer role, which can create releases and patches. Choose
App Manager instead if the job also creates apps, for example by running
shorebird init. - Under API keys, click Create key, enter a name, and choose an expiration.
- Copy the key. It is shown only once.
Store the key as SHOREBIRD_TOKEN in your CI platform’s secrets manager, as the
steps below show.
If you can’t create a service account, a personal API key from Account → API
Keys goes in SHOREBIRD_TOKEN the same way. It acts as you, can do at most
what your own role allows, and stops working if your account is deleted. See
API Keys.
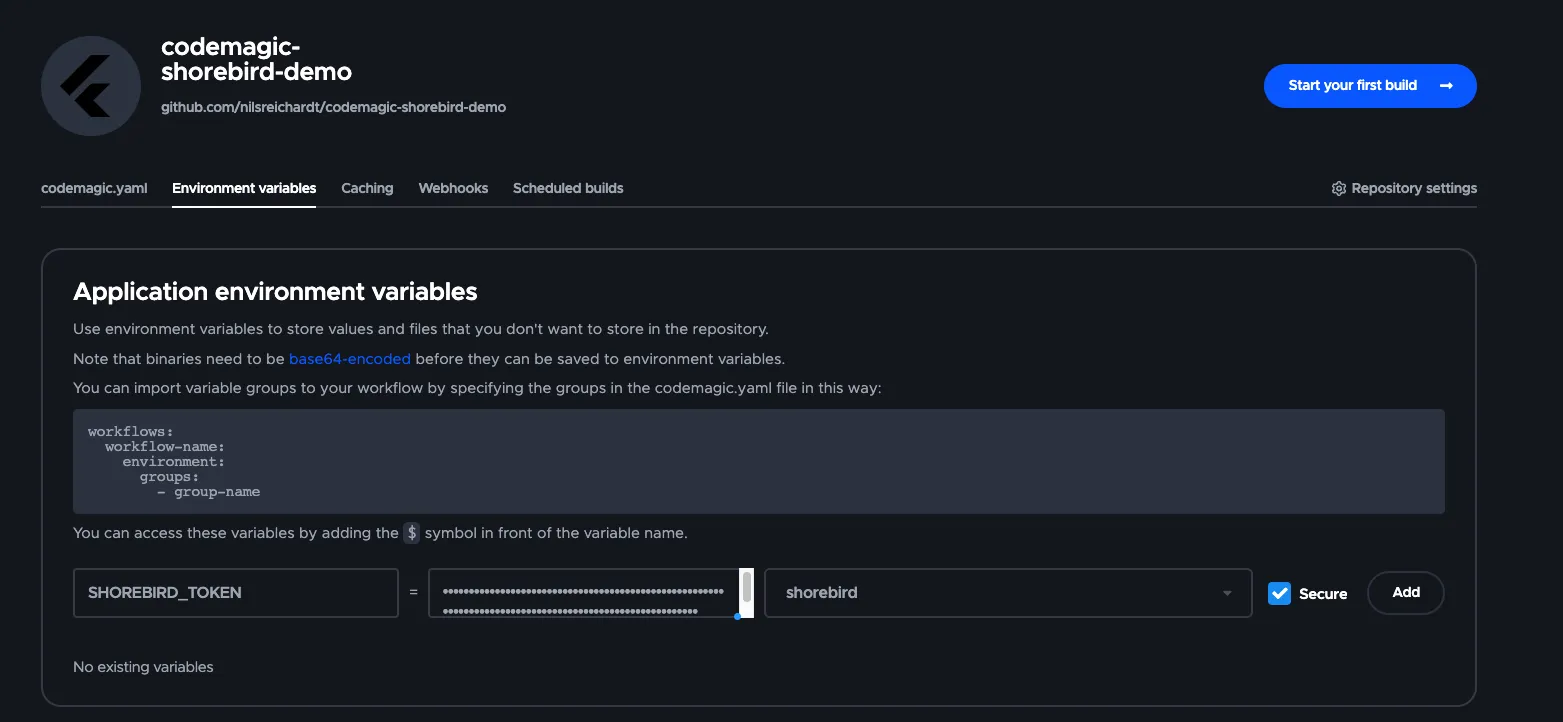
Next, with the key copied, navigate to your Codemagic secrets:
- Select the “teams” tab on the left sidebar.
- Select the team you want to add the secret to.
- Select the “Global Variables and Secrets” tab.
- Enter
SHOREBIRD_TOKENas variable name. - Paste the token into the variable value field.
- Add it to a group named
shorebird. - Ensure “Secure” is checked.
Set up an Android workflow
Section titled “Set up an Android workflow”This section shows you how to set up a Codemagic workflow to create Android
releases, distribute them to the Play Store, and patch them once they’ve been
distributed, using codemagic.yaml. To use the Workflow Editor instead, see
Choose how to configure Codemagic.
As a preview, the finished codemagic.yaml file will look like this:
Prerequisites
Section titled “Prerequisites”Give Codemagic permission to publish to the Play Store
Section titled “Give Codemagic permission to publish to the Play Store”You can follow the Codemagic guide
here
to set this up. This example places the GCLOUD_SERVICE_ACCOUNT_CREDENTIALS
variable in a group named play_store.
Set up your Android keystore in Codemagic
Section titled “Set up your Android keystore in Codemagic”You can follow the Codemagic guide
here to create a
keystore and upload it to Codemagic. This example uses android_keystore as the
name of the uploaded keystore.
You will also also need to update your android/app/build.gradle file to use
this keystore in the Codemagic CI environment:
Create shared configuration
Section titled “Create shared configuration”At the top of the codemagic.yaml file, define shared environment variables and
scripts that will be used by multiple workflows. This has been annotated to
explain what each part does.
Add the Android release workflow
Section titled “Add the Android release workflow”Add the following workflow to your codemagic.yaml file. This has been
annotated to explain what each part does.
With this, you should be able to create a release in Shorebird and publish it to the Google Play Store via Codemagic.
Add the Android patch workflow
Section titled “Add the Android patch workflow”Add the following workflow to your codemagic.yaml file. This has been
annotated to explain what each part does.
With this, you should be able to patch a release in Shorebird via Codemagic.
Set up an iOS workflow
Section titled “Set up an iOS workflow”This section shows you how to set up a Codemagic workflow to create iOS
releases, distribute them to TestFlight, and patch them once they’ve been
distributed, using codemagic.yaml. To use the Workflow Editor instead, see
Choose how to configure Codemagic.
Prerequisites
Section titled “Prerequisites”Prepare your iOS code signing
Section titled “Prepare your iOS code signing”Codemagic has a guide on how to set up code signing for iOS here. This guide will help you generate the necessary keys, certificates, and provisioning profiles and load them into Codemagic.
Once you’ve done that, you will need to make these available to your
codemagic.yaml scripts. You will end up with four environment variables to
support this:
KEY_ID: This will be copied directly from App Store Connect.ISSUER_ID: This will be copied directly from App Store Connect.APP_STORE_CONNECT_PRIVATE_KEY: This will be the contents of the private key file you downloaded from App Store Connect. An easy way to get this into Codemagic is to runcat /path/to/AuthKey_12345678.p8 | pbcopywhich will copy the contents of the file to your clipboard. You can then paste this into Codemagic.CERTIFICATE_PRIVATE_KEY: Follow this guide to obtainios_distribution_private_keyfile. You can then paste the contents of this file into Codemagic.cat ios_distribution_private_key | pbcopyworks well for this.
This example places all of these variables into a group named app_store.
Create a shared configuration
Section titled “Create a shared configuration”At the top of the codemagic.yaml file, define shared environment variables and
scripts that will be used by multiple workflows. This has been annotated to
explain what each part does.
Pin the Xcode version
Section titled “Pin the Xcode version”Without an xcode: value, Codemagic builds with its default Xcode, which moves
to a newer version when Codemagic updates its machines. Build each iOS patch
with the same Xcode as the release it patches: a different Xcode can make the
patch report asset or Podfile.lock changes you didn’t make, which stops it in
CI (see
Build patches with the same toolchain as the release).
So the shared configuration above sets xcode: to a version from
Codemagic’s macOS machine list,
rather than latest or edge. It also sets cocoapods: to a version, since
the default is whatever the machine image has when the build runs, and the
CocoaPods version is recorded in Podfile.lock. Use the version on the
COCOAPODS: line of your Podfile.lock. Keep both while you patch a release,
and change them when you create a new one.
Add the iOS release workflow
Section titled “Add the iOS release workflow”Add the following workflow to your codemagic.yaml file. This has been
annotated to explain what each part does.
With this, you should be able to create a release in Shorebird and publish it to TestFlight via Codemagic.
Add the iOS patch workflow
Section titled “Add the iOS patch workflow”Add the following workflow to your codemagic.yaml file:
With this, you should be able to patch a release in Shorebird via Codemagic.